La Red Residual (Residual Network, ResNet)
Mariano Rivera
agosto 2019
Código tomado de la documentación de Keras: ResNet Keras example implementation
La redes residuales se inspiran en el hecho biológico de que algunas neuronas se conectan con neuronas en capas no necesariamente contiguas, saltando capas intermedias, y fueron propuesta por Kaiming et al. (2015).
-
ResNet es una red usada como elemento básico en muchas tareas de Visión por Computadora.
-
Fué la red ganadora del la competencia (challenge) ImageNet en 2015.
-
Su mayor impacto se debe a que el paradigma ResNet permitió por primera vez entrenar redes muy profundas (de más de 100 capas); controlando con éxito el problema de Desvanecimiento de Gradiente (Vanishing Gradient).
Redes relevantes en la Competencia ImageNet:
| Red | Año | Capas | Error % |
|---|---|---|---|
| AlexNet | 2013 | 8 | 11.7 |
| VGG | 2014 | 19 | 7.3 |
| Inception | 2014 | 22 | 6.7 |
| ResNet | 2015 | 152 | 3.6 |
Revisión de los Bloques Convolucionales
Como referencia, en la siguiente figura se ilustran dos bloques basados en capas convolucionales.
bloque, en est caso consiste de una capa convolucional 2D, un capa de normalización por lote (BatchNormalization) y la capa de la función de activación (RELU en este caso).
Los parámetros de la capa convoluciónal (stride, padding) han sido seleccionados tal que el tensor de salida tenga las mismas dimensiones espaciales que el de entrada, variando solo en que tendrá ahora m canales en la salida del primer bloque y n en canales en el segundo bloque.
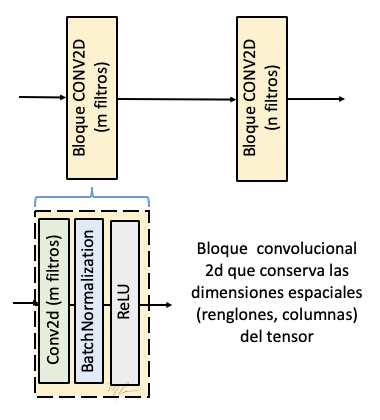
El cálculo realizado por el bloque convolucional a se explica a continuación:
- Convolución bidimensional a la entrada de dimensión
(num_renglones, num_columnas, num_canales):
(1)
para , donde es el número de filtros (tridimensionales) a aplicar en la convolución-2d.
- Normalización por lote del -ésimo lote denotado por . Primero, se estima la media del lote
(2)
y la desviación estándard del lote
(3)
donde es una constante pequeña positiva que evita que . Luego, se normaliza respecto al lote:
(4)
Ahora tendrá media cero y desviación estándar igual a uno. Con ello se evita que el valor de sea, o muy grande, o muy pequeño. Sin embargo, si el reescalamiento no fuera necesario, este se puede revertir mediante los dos parámetros entrenables de la capa (), válidos para todos los lotes:
(5)
- Aplicar la función de activación a la
(7)
Hemos omitido por simplicidad de notación el término de bias.
Si representamos por y las transformacionesn realizadas por la primera y segunda capa convolucional, respectivamente; entonces la transformación de las dos capas se corresponde a la composición de las funciones no lineales y :
(8)
Esto es
(9)
La Red Residual Versión 2 (ResNet v2)
Los autores de la red residual publicaron 2 versiones de la aquitectura ResNet; la segunda mejorando el desempeño de la primera versión. En este tutorial nos enfocaremos en la segunda versión, que es además mas elegante e intuitiva.
La idea de la ResNet, es mejorar el desempeño de las redes llamadas Completamente Convolucionales (Fully Convolutional Networrks, FCN). Las FCN fueron inicialmente concebidas para estimar una imágen (parche) a partir de una imágen (o parche); a diferencia de las redes clásicas que solo estiman el valor de un pixel dada la vecindad del mismo (parche). Con esta estrategia se procesan todos los pixeles del parche en un solo paso de inferencia.
Bloque Residual Identidad
Asumamos el problema simple de llenar huecos en imágenes dende la cámara con que se capturó la imágen tenía pixeles muertos. Entonces, dado una vecindad de la imagen (parche) de entrada hay que estimar el valor de los pixeles faltantes. Este problema lo podemos modelar como el estimar una correción a el tensor de entrada : $
x_2 = x + F(x)
$. Simplificando aun más la notación, seguiremos llamando a la imágen de salida del bloque de cálculo:
(10)
Esta forma estima un tensor residual mediante red. Típicamente, un bloque residual (versión 2) se implementa como ilustra la figura siguiente.
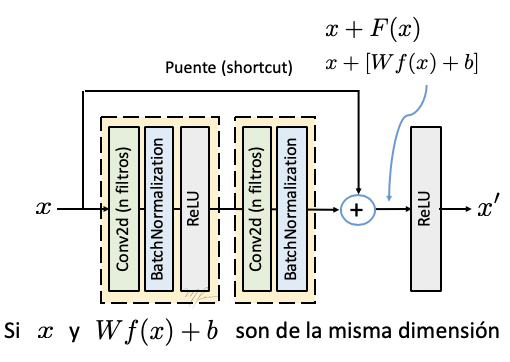
El bloque ilustrado arriba se denomina Bloque Residual Identidad debido a los datos que son “puenteados” no son modificados, esto es porque el tensor que resulta de las etapas convolucionales (representdo por ) es de las mismas dimensiones que los datos originales, por lo que no es necesario ajustar las dimensiones para sumarlos.
Bloque Residual Convolucional
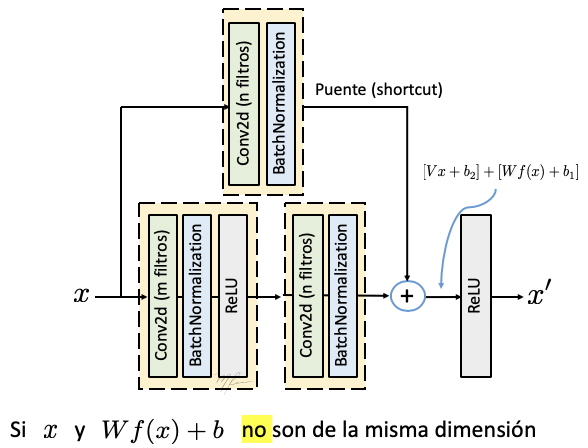
Consideremos el caso en que las dimensiones de y son distintas; ya sea porque se incrementó el número de canales o se cambiaron las dimensiones espaciales del tensor (o ambas). En tal caso, es vecesario aplicar una operación a para hacer congruentes las dimensiones.
Generalmente la primera capa convolucional usa un paso (stride) igual a dos (lo que reduce las dimensiiones espaciales a la mitar, y la segunda capa convolucional cambia el número de canales. Por ello, para poder hacer la suma de la liga residual con los datos procesados, se agrega una capa convolucional (sin activación) en la liga puente con paso de dos y con el número de canales requeridos:
(10)
A este tipo de bloques residuales que cambian el número de canales del tensor de entrada se les denomina Bloque Residual Convolucional. La siguiente figura ilustra este bloque residual.
La ResNet V2
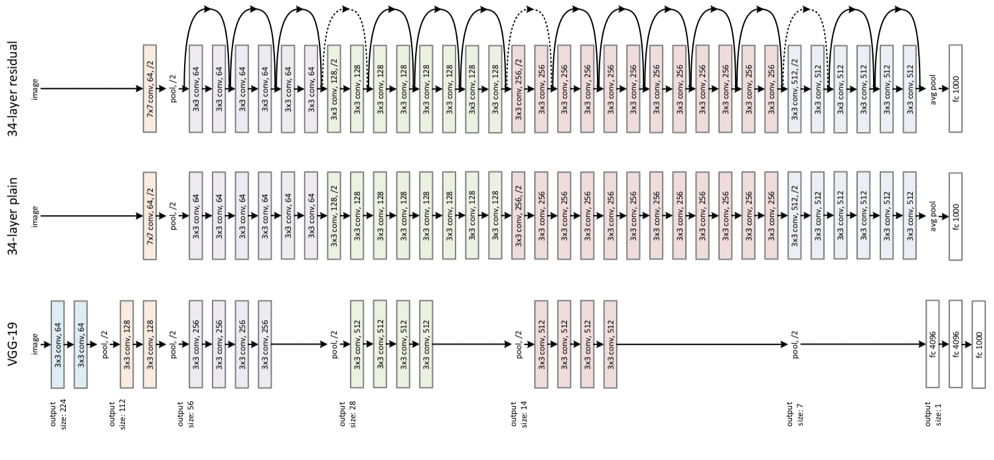
En la siguiente figura (tomada de Kaiming et al, 2015) se muestra la arquitectura de la red VGG19, red convolucional de 19 capas que ganó la competencia ImageNet en 2014 con un error de 7.4%. La arquitectura de la ResNet50, red residual de 152 capas ganadora del mismo concurso con un error de 3.6%. Como referencia se muestra una versión convolucional de 152 capas (sin ligas puentes).
Bibliografía
(Kaiming et al, 2015) He, Kaiming et al. “Deep Residual Learning for Image Recognition.” 2016 IEEE Conference on Computer Vision and Pattern Recognition (CVPR) (2015): 770-778.
(Krishevsky, 2009) Alex Krizhevsky, Learning Multiple Layers of Features from Tiny Images, 2009.
Implementación de la ResNet (ejemplo de la documentación de Keras)
import os
os.environ["CUDA_DEVICE_ORDER"]="PCI_BUS_ID";
os.environ["CUDA_VISIBLE_DEVICES"]="0";
from __future__ import print_function
import keras
from keras.layers import Dense, Conv2D, BatchNormalization, Activation
from keras.layers import AveragePooling2D, Input, Flatten
from keras.optimizers import Adam
from keras.callbacks import ModelCheckpoint, LearningRateScheduler
from keras.callbacks import ReduceLROnPlateau
from keras.preprocessing.image import ImageDataGenerator
from keras.regularizers import l2
from keras import backend as K
from keras.models import Model
from keras.utils import plot_model

from keras.datasets import cifar10
import numpy as np
import os
Using TensorFlow backend.
Parámetros de entrenamiento
batch_size        = 32  # el paper original usa un tamaño de 128
epochs            = 200
data_augmentation = True
num_classes       = 10
subtract_pixel_mean = True  # substrae la media a cada parche (mejor el error)
Parámetros del modelo vs la exactitud (accuracy)
| Modelo | n v1(v2) | 200-epoch v1 | Orig Paper v1 | 200-epoch v2 | Orig Paper v2 | sec/epoch v1(v2) |
|---|---|---|---|---|---|---|
| ResNet20 | 3 (2) | 91.3 | 91.25 | 91.8 | ----- | 35 (—) |
| ResNet32 | 5(NA) | 92.46 | 92.49 | NA | NA | 50 ( NA) |
| ResNet44 | 7(NA) | 92.50 | 92.83 | NA | NA | 70 ( NA) |
| ResNet56 | 9 (6) | 92.71 | 93.03 | 93.01 | NA | 90 (100) |
| ResNet110 | 18(12) | 92.65 | 93.39±.16 | 93.15 | 93.63 | 165(180) |
| ResNet164 | 27(18) | ----- | 94.07 | ----- | 94.54 | —(---) |
| ResNet1001 | (111) | ----- | 92.39 | ----- | 95.08±.14 | —(---) |
n = 3

# Versión del Modelo
'''
Orig paper:      version = 1 (ResNet v1),
Improved ResNet: version = 2 (ResNet v2)
'''
version = 2  # se incluye el código de ambas versiones, pero solo se introdujo la versión 2

# Calculando la profundidad del modelo dependiendo del parámetro n
if version == 1:
    depth = n * 6 + 2
elif version == 2:
    depth = n * 9 + 2

# Nombre del modelo (para ser salvado durante callback)
model_type = 'ResNet%dv%d' % (depth, version)
Cargar datos del problema
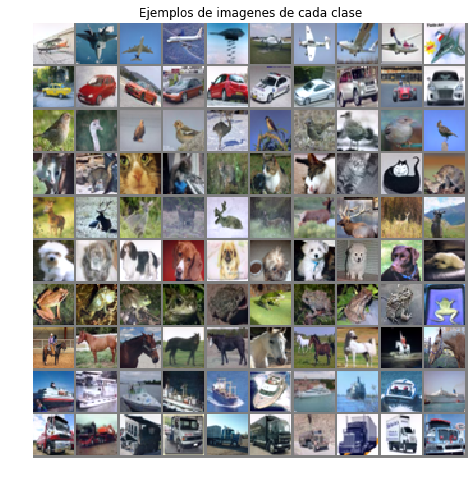
Se usa la base de datos CIFAR-10 recopiladad por Krishevsky (2009). La base de datos consiste en
-
60,000 imágenes de color de 32x32 pixeles correspondientes a 10 clases (6000 imágenes por clase).
-
50,000 imágenes para entrenamiento.
-
10,000 imágenes para prueba.
-
Las Clases son: airplane, automobile, bird, cat, deer, dog, frog, horse, ship, truck.
Generalmente el conjunto de entrenamiento se divide en 5 lotes (batches) de 10,000 imágenes cada uno.
# Cargar datos de Cifar-10 (Keras las descargara por nosotros la primera vez)
(x_train, y_train), (x_test, y_test) = cifar10.load_data()
input_shape = x_train.shape[1:]

# Normalización de los datos [0,1]
x_train = x_train.astype('float32') / 255
x_test  = x_test.astype( 'float32') / 255

# Substracción de la media (mejora el desempeño)
if subtract_pixel_mean:
    x_train_mean = np.mean(x_train, axis=0)
    x_train -= x_train_mean
    x_test -= x_train_mean

print(x_train.shape[0], 'train samples')
print(x_test.shape[0],  'test samples')
print('x_train shape:', x_train.shape)
print('y_train shape:', y_train.shape)
50000 train samples
10000 test samples
x_train shape: (50000, 32, 32, 3)
y_train shape: (50000, 1)
import numpy as np
show_img_class = 10
offset=2

szCanvas = (32+offset)*show_img_class
canvas = np.zeros((szCanvas,szCanvas,3))

indices=[]
low=300
for cl in range(num_classes):
    indices.append([i for i, x in enumerate(y_train) if x==cl][low:low+10])

for i in range(num_classes):
    for j,idx_im in enumerate(indices[i]):
        ii=(32+offset)*i
        jj=(32+offset)*j
        canvas[ii:ii+32,jj:jj+32,:] = x_train[idx_im]
import matplotlib.pyplot as plt

plt.figure(figsize=(8,8))
plt.imshow(canvas+0.5)
plt.axis('off')
plt.title('Ejemplos de imagenes de cada clase')
plt.show()
Clipping input data to the valid range for imshow with RGB data ([0..1] for floats or [0..255] for integers).
# De indices de clases a vectores indicadores
y_train = keras.utils.to_categorical(y_train, num_classes)
y_test  = keras.utils.to_categorical(y_test,  num_classes)
def lr_schedule(epoch):
    """ Calendario para la Razón de Aprendizaje
        (Learning Rate Schedule)

    Reducción de la razón de aprendizaje luego de las épocas 80, 120, 160, 180.
    La reducción se hace a través de un "callback" durente el entrenamiento

    Parámetros
        epoch (int): epoca actual del entrenamiento

    Regresa
        lr (float32): razón de aprendizaje
    """
    lr = 1e-3
    if epoch > 180:
        lr *= 0.5e-3
    elif epoch > 160:
        lr *= 1e-3
    elif epoch > 120:
        lr *= 1e-2
    elif epoch > 80:
        lr *= 1e-1
    print('Learning rate: ', lr)
    return lr
def resnet_layer(inputs,
                 num_filters  = 16,
                 kernel_size  = 3,
                 strides      = 1,
                 activation   = 'relu',
                 batch_normalization=True,
                 conv_first   = True):
    """2D Convolution-Batch Normalization-Activation stack builder

    # Arguments
        inputs (tensor):     input tensor from input image or previous layer
        num_filters (int):   Conv2D number of filters
        kernel_size (int):   Conv2D square kernel dimensions
        strides (int):       Conv2D square stride dimensions
        activation (string): activation name
        batch_normalization (bool): whether to include batch normalization
        conv_first (bool):   conv-bn-activation (True) or
                             bn-activation-conv (False)

    # Returns
        x (tensor): tensor as input to the next layer
    """
    conv = Conv2D(num_filters,
                  kernel_size        = kernel_size,
                  strides            = strides,
                  padding            = 'same',
                  kernel_initializer = 'he_normal',
                  kernel_regularizer = l2(1e-4))

    x = inputs
    if conv_first:
        x = conv(x)
        if batch_normalization:
            x = BatchNormalization()(x)
        if activation is not None:
            x = Activation(activation)(x)
    else:
        if batch_normalization:
            x = BatchNormalization()(x)
        if activation is not None:
            x = Activation(activation)(x)
        x = conv(x)
    return x
def resnet_v1(input_shape, depth, num_classes=10):
    """ResNet Version 1 Model builder [a]

    Stacks of 2 x (3 x 3) Conv2D-BN-ReLU
    Last ReLU is after the shortcut connection.
    At the beginning of each stage, the feature map size is halved (downsampled)
    by a convolutional layer with strides=2, while the number of filters is
    doubled. Within each stage, the layers have the same number filters and the
    same number of filters.
    Features maps sizes:
    stage 0: 32x32, 16
    stage 1: 16x16, 32
    stage 2:  8x8,  64
    The Number of parameters is approx the same as Table 6 of [a]:
    ResNet20 0.27M
    ResNet32 0.46M
    ResNet44 0.66M
    ResNet56 0.85M
    ResNet110 1.7M

    # Arguments
        input_shape (tensor): shape of input image tensor
        depth (int): number of core convolutional layers
        num_classes (int): number of classes (CIFAR10 has 10)

    # Returns
        model (Model): Keras model instance
    """
    if (depth - 2) % 6 != 0:
        raise ValueError('depth should be 6n+2 (eg 20, 32, 44 in [a])')
    # Start model definition.
    num_filters = 16
    num_res_blocks = int((depth - 2) / 6)

    inputs = Input(shape=input_shape)
    x = resnet_layer(inputs=inputs)
    # Instantiate the stack of residual units
    for stack in range(3):
        for res_block in range(num_res_blocks):
            strides = 1
            if stack > 0 and res_block == 0:  # first layer but not first stack
                strides = 2  # downsample
            y = resnet_layer(inputs      = x,
                             num_filters = num_filters,
                             strides     = strides)
            y = resnet_layer(inputs      = y,
                             num_filters = num_filters,
                             activation  = None)
            if stack > 0 and res_block == 0:  # first layer but not first stack
                # linear projection residual shortcut connection to match
                # changed dims
                x = resnet_layer(inputs      = x,
                                 num_filters = num_filters,
                                 kernel_size = 1,
                                 strides     = strides,
                                 activation  = None,
                                 batch_normalization=False)
            x = keras.layers.add([x, y])
            x = Activation('relu')(x)

        #  end for res_block
        num_filters *= 2

    # end for stack

    # Add classifier on top.
    # v1 does not use BN after last shortcut connection-ReLU
    x = AveragePooling2D(pool_size=8)(x)
    y = Flatten()(x)
    outputs = Dense(num_classes,
                    activation='softmax',
                    kernel_initializer='he_normal')(y)

    # Instantiate model.
    model = Model(inputs=inputs, outputs=outputs)
    return model
def resnet_v2(input_shape, depth, num_classes=10):
    """ResNet Version 2 Model builder [b]

    Stacks of (1 x 1)-(3 x 3)-(1 x 1) BN-ReLU-Conv2D or also known as
    bottleneck layer
    First shortcut connection per layer is 1 x 1 Conv2D.
    Second and onwards shortcut connection is identity.
    At the beginning of each stage, the feature map size is halved (downsampled)
    by a convolutional layer with strides=2, while the number of filter maps is
    doubled. Within each stage, the layers have the same number filters and the
    same filter map sizes.
    Features maps sizes:
    conv1  : 32x32,  16
    stage 0: 32x32,  64
    stage 1: 16x16, 128
    stage 2:  8x8,  256

    # Arguments
        input_shape (tensor): shape of input image tensor
        depth (int): number of core convolutional layers
        num_classes (int): number of classes (CIFAR10 has 10)

    # Returns
        model (Model): Keras model instance
    """
    if (depth - 2) % 9 != 0:
        raise ValueError('depth should be 9n+2 (eg 56 or 110 in [b])')
    # Start model definition.
    num_filters_in = 16
    num_res_blocks = int((depth - 2) / 9)

    inputs = Input(shape=input_shape)
    # v2 performs Conv2D with BN-ReLU on input before splitting into 2 paths
    x = resnet_layer(inputs      = inputs,
                     num_filters = num_filters_in,
                     conv_first  = True)

    # Instantiate the stack of residual units
    for stage in range(3):
        for res_block in range(num_res_blocks):
            activation = 'relu'
            batch_normalization = True
            strides = 1
            if stage == 0:
                num_filters_out = num_filters_in * 4
                if res_block == 0:  # first layer and first stage
                    activation = None
                    batch_normalization = False
            else:
                num_filters_out = num_filters_in * 2
                if res_block == 0:  # first layer but not first stage
                    strides = 2    # downsample

            # bottleneck residual unit
            y = resnet_layer(inputs=x,
                             num_filters = num_filters_in,
                             kernel_size = 1,
                             strides     = strides,
                             activation  = activation,
                             batch_normalization=batch_normalization,
                             conv_first  = False)
            y = resnet_layer(inputs      = y,
                             num_filters = num_filters_in,
                             conv_first  = False)
            y = resnet_layer(inputs      = y,
                             num_filters = num_filters_out,
                             kernel_size = 1,
                             conv_first  = False)
            if res_block == 0:
                # linear projection residual shortcut connection to match
                # changed dims
                x = resnet_layer(inputs      = x,
                                 num_filters = num_filters_out,
                                 kernel_size = 1,
                                 strides     = strides,
                                 activation  = None,
                                 batch_normalization=False)
            x = keras.layers.add([x, y])

        num_filters_in = num_filters_out

    # Add classifier on top.
    # v2 has BN-ReLU before Pooling
    x = BatchNormalization()(x)
    x = Activation('relu')(x)
    x = AveragePooling2D(pool_size=8)(x)
    y = Flatten()(x)
    outputs = Dense(num_classes,
                    activation='softmax',
                    kernel_initializer='he_normal')(y)

    # Instantiate model.
    model = Model(inputs=inputs, outputs=outputs)
    return model
if version == 2:
    model = resnet_v2(input_shape=input_shape, depth=depth)
else:
    model = resnet_v1(input_shape=input_shape, depth=depth)

model.compile(loss='categorical_crossentropy',
              optimizer=Adam(lr=lr_schedule(0)),
              metrics=['accuracy'])
#model.summary()
==================================================================================================
    Total params: 849,002
    Trainable params: 843,786
    Non-trainable params: 5,216
    __________________________________________________________________________________________________

```python
plot_model(model, to_file='resnetv2.png', show_shapes=True)

Preparar el directorio para salvar el modelo cada época en que se mejore el error de validación
save_dir = os.path.join(os.getcwd(), 'saved_models')
model_name = 'cifar10_%s_model.{epoch:03d}.h5' % model_type
if not os.path.isdir(save_dir):
    os.makedirs(save_dir)
filepath = os.path.join(save_dir, model_name)

# Prepare callbacks for model saving and for learning rate adjustment.
checkpoint = ModelCheckpoint(filepath=filepath,
                             monitor='val_acc',
                             verbose=1,
                             save_best_only=True)

lr_scheduler = LearningRateScheduler(lr_schedule)

lr_reducer = ReduceLROnPlateau(factor=np.sqrt(0.1),
                               cooldown=0,
                               patience=5,
                               min_lr=0.5e-6)

callbacks = [checkpoint, lr_reducer, lr_scheduler]
Entrenar el modelo con o sin aumentación de datos
# SIN aumantación de datos
if not data_augmentation:
    print('Not using data augmentation.')
    model.fit(x_train, y_train,
              batch_size=batch_size,
              epochs=epochs,
              validation_data=(x_test, y_test),
              shuffle=True,
              callbacks=callbacks)

# CON aumentación de datos
else:
    print('Using real-time data augmentation.')
    # This will do preprocessing and realtime data augmentation:
    datagen = ImageDataGenerator(
        # set input mean to 0 over the dataset
        featurewise_center=False,
        # set each sample mean to 0
        samplewise_center=False,
        # divide inputs by std of dataset
        featurewise_std_normalization=False,
        # divide each input by its std
        samplewise_std_normalization=False,
        # apply ZCA whitening
        zca_whitening=False,
        # epsilon for ZCA whitening
        zca_epsilon=1e-06,
        # randomly rotate images in the range (deg 0 to 180)
        rotation_range=0,
        # randomly shift images horizontally
        width_shift_range=0.1,
        # randomly shift images vertically
        height_shift_range=0.1,
        # set range for random shear
        shear_range=0.,
        # set range for random zoom
        zoom_range=0.,
        # set range for random channel shifts
        channel_shift_range=0.,
        # set mode for filling points outside the input boundaries
        fill_mode='nearest',
        # value used for fill_mode = "constant"
        cval=0.,
        # randomly flip images
        horizontal_flip=True,
        # randomly flip images
        vertical_flip=False,
        # set rescaling factor (applied before any other transformation)
        rescale=None,
        # set function that will be applied on each input
        preprocessing_function=None,
        # image data format, either "channels_first" or "channels_last"
        data_format=None,
        # fraction of images reserved for validation (strictly between 0 and 1)
        validation_split=0.0)

    # Compute quantities required for featurewise normalization
    # (std, mean, and principal components if ZCA whitening is applied).
    datagen.fit(x_train)

    # Fit the model on the batches generated by datagen.flow().
    model.fit_generator(datagen.flow(x_train, y_train, batch_size=batch_size),
                        validation_data = (x_test, y_test),
                        epochs          = epochs,
                        verbose         = 1,
                        workers         = 4,
                        callbacks       = callbacks,
                        steps_per_epoch = len(x_train)/batch_size)

# pasar el argumento step_per_epoch (ultima línea) es necesario en keras 2.19+
Using real-time data augmentation.
Epoch 1/200
Learning rate:  0.001
1563/1562 [==============================]
- 66s 42ms/step
- loss: 1.8568
- acc: 0.4901
- val_loss: 1.6176
- val_acc: 0.5553

Epoch 00001: val_acc improved from -inf to 0.55530, saving model to /home/mariano/Work/deep/10.0 ResNet/saved_models/cifar10_ResNet29v2_model.001.h5
Epoch 2/200
Learning rate:  0.001
1563/1562 [==============================]
- 59s 38ms/step
- loss: 1.3897
- acc: 0.6205
- val_loss: 1.4713
- val_acc: 0.5891

Epoch 00002: val_acc improved from 0.55530 to 0.58910, saving model to /home/mariano/Work/deep/10.0 ResNet/saved_models/cifar10_ResNet29v2_model.002.h5

  ...

Epoch 200/200
Learning rate:  5e-07
1563/1562 [==============================]
- 59s 38ms/step
- loss: 0.1836
- acc: 0.9817
- val_loss: 0.4310
- val_acc: 0.9182

Epoch 00200: val_acc did not improve from 0.91920
Evaluacion en los datos de prueba
scores = model.evaluate(x_test, y_test, verbose=1)
print('Test loss:', scores[0])
print('Test accuracy:', scores[1])
10000/10000 [==============================] - 2s 223us/step
Test loss: 0.431003714299202
Test accuracy: 0.9182