
| I. Introduction | III. Using BioP |
Part II. Starting
This part of the manual provides a quick way to start using BioP. It will be shown how to open and create proyects, adapt the preferences, and create additional archives (a priori information, sampling bias). After reading this section, one should be able to run rapid sessions in BioP. An example is included to make all this more interactive.
II.1. Installation
BioP is distributed as a simple executable archive (.exe). This archive can be obtained from the following URL: www.cimat.mx/~chrisom/download.html, where the program will be actualized regularly according to the needs and wishes of the users. It's important to have with at least 1 GB of space in the hard disk.
Installing BioP
- Execute SetupBioP_sencillo.0.9.18.exe
- Once BioP is installed (SetupBioP.exe), actualizations can be rapidly installed using the small BioP.exe or SetupBioP_sencillo.0.9.18.exe files which do not contain all examples of the larger distribution.
- Generally one can accept the default options.
- By default BioP creates a directory on the Windows primary hard disk (C:\BioP). In case you have multiple hard disks, it is recommended to install BioP under C:\.
II.2. Starting BioP
To start the application, double-click on the desktop icon
.jpg) , or select Start -> All Programs -> BioP -> ProjectBioP.exe.
, or select Start -> All Programs -> BioP -> ProjectBioP.exe.
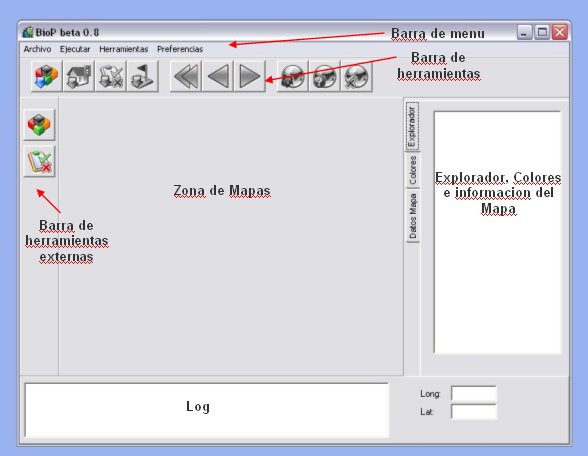
Upon starting BioP, the main screen is shown.
II.2.1. Main screen
This screen is a starting point for actions such as:- Load the archive containing the covariables
- Load the archive containing the sampling bias
- Load the archive containing the prior information
- Load the archive containing the observations of the species
- Run the calculations
- Explore the archives and the results
- Export the archives
- Change preferences such as the working language
Main components of the screen.
| I. Introduction | III. Using BioP |